iOS Code Signing, Development and Distribution Provisioning Profiles explained
In this blog post we want to show you how iOS code signing works and we want to help you certify your iOS apps properly so that you can test them via Updraft and publish them later to the Apple Store. Every organization, company and developer who wants to make iOS apps available to the public via the Apple Store must certify their iOS apps - all iOS apps must be signed with a valid certificate from Apple.
Simply summarized; code signing is a digital signature of the developed iOS code by the developer of the code. It confirms that the code cannot be modified or attacked by anyone other than the certified developer. At the same time code signing makes the app more secure for the user.
iOS Code Signing
Fundamentally, we could define iOS Code signing as follows: Code signing controls which iOS apps, made by which developer, can run on which devices.
We can see that there are three main aspects:
-
Apps📦 – We need a way to uniquely identify an application
-
Developers👩💻👨💻– A developer (or group thereof) must be able to prove their identity
-
Devices📱⌚️ – An app can be distributed in different ways, and iOS must be able to identify which ways are allowed and which are not
What is required to sign an iOS app?
Four problems, four components to solve them: Certificate Signing Request (CSR), Apple Certificates, Provisioning Profiles and Bundle Identifiers.
Certificate Signing Request (CSR)
A Certificate Signing Request (CSR) is a process to create a digital certificate from the Certificate Authority Apple, so that Apple can verify if all the details and data of the developer are correct.
Apple Certificates
Developers can create certificates📜, which enable them to prove their identity to Apple, or to iOS respectively.
In order to get an Apple certificate you need to have a developer membership from Apple first. The annual fee is around 99 dollars. Once you become an apple member, you have access to the Apple Developer Portal where you can create the iOS certificate for development.
Provisioning Profiles
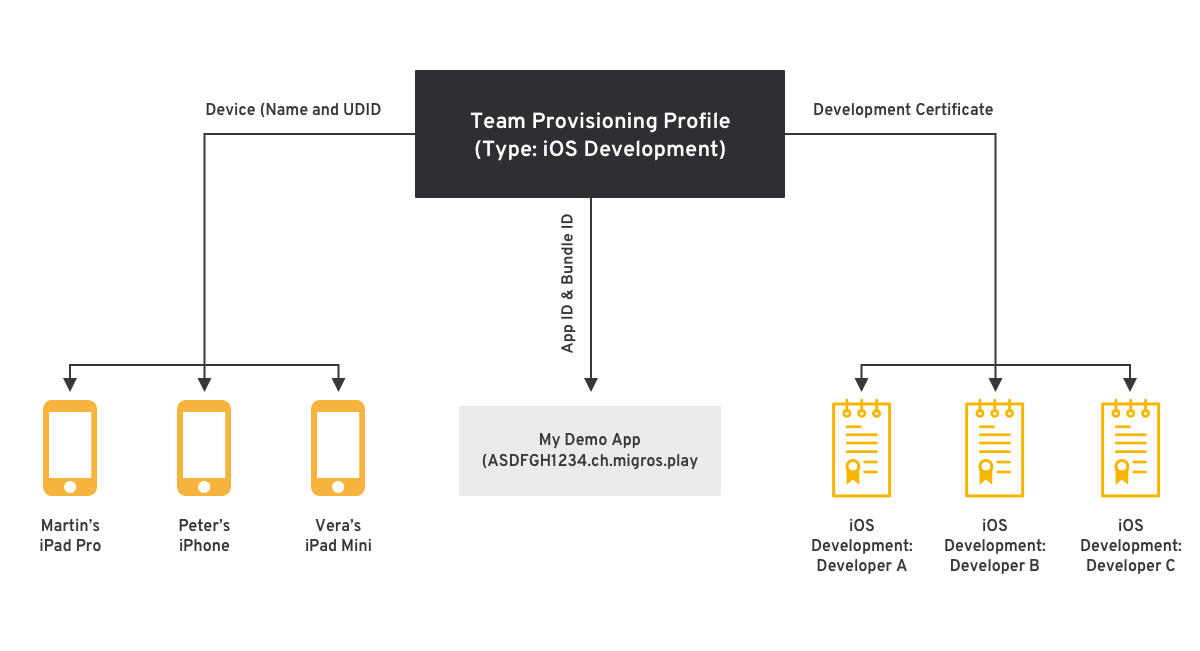
Now to tie it all together and enable your app to run, you need to use Provisioning Profiles✉️. A provisioning profile specifies a Bundle Identifier, so the system knows which app the permission is for, a certificate, with the information who created the app, and it’s defined in which ways the app can be distributed. The provisioning profile is therefore a combination of the App ID, the Bundle ID, the device ID or list of device IDs and the certificates (Development or Distribution).
Example for development provisioning profile:
Bundle Identifier (Bundle ID)
A Bundle Identifier🏷is just a string, typically of the form <country>.<developer>.<project> to identify an application. For example the Migros Play app uses ch.migros.play. Since the same Bundle Identifier could theoretically be used by different developers, this is automatically prefixed by Code Signing with the Team Identifier which is created during the registration of a developer with Apple. The final Bundle ID of an app looks something like ASDFGH1234.ch.migros.play.
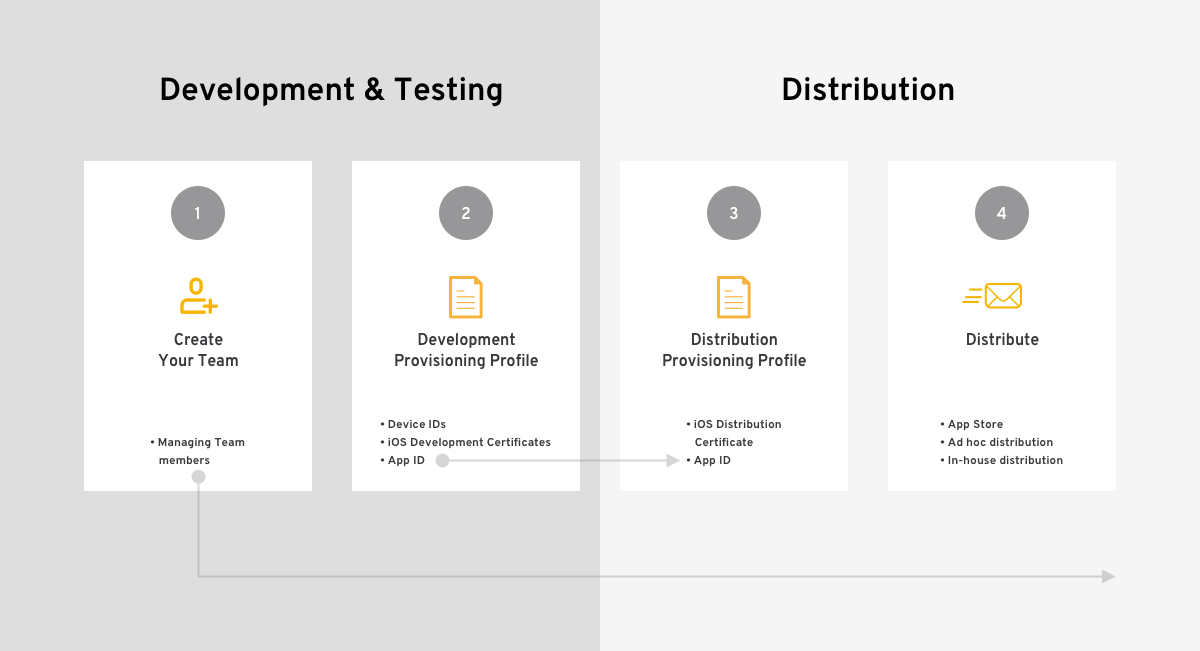
What is the difference between provisioning profile development and provisioning profile distribution?
There are different kinds of certificates and provisioning profiles, and together, they are used for different purposes. Let's explore which types of certificates and provisioning profiles you need in order to achieve your needs.
First of all we need to explain the difference between the development provisioning profile and the distribution profile. The development provisioning profile is for testing your app on a single device. The distribution profile however is used when you want to submit your app to your beta testers or to the App store. These provisioning profiles are therefore responsible for the connection between your iOS device and your apple developer account. Both profiles are linked to your apple developer account.
Apple defines a provisioning profile as follows: A provisioning profile is a collection of digital entities that uniquely ties developers and devices to an authorized iPhone Development Team and enables a device to be used for testing.
Development Provisioning Profile
Development 🛠 – Simulator 💻
Let's start with an exception – but in favor of simplicity. To run an app on the iOS Simulator that comes with Xcode, you don't need any code signing at all! Just hit "Run" and the app will run.
Development 🛠 – Real Device📱
Certificate: Development
Provisioning Profile: Development
Of course, testing the app on a real device is better because this is a more accurate representation of the environment it will be running in once it is distributed. Signing your app for Development allows you to build it in Xcode and directly run it on a device – be it iOS, watchOS or tvOS. The device has to be physically connected to your machine with a cable or over the network. The app will then be installed directly onto the device. For this, you need a Development Certificate, along with a Development Provisioning Profile. Both are needed to run the app on a device.
Distribution Provisioning Profile Overview
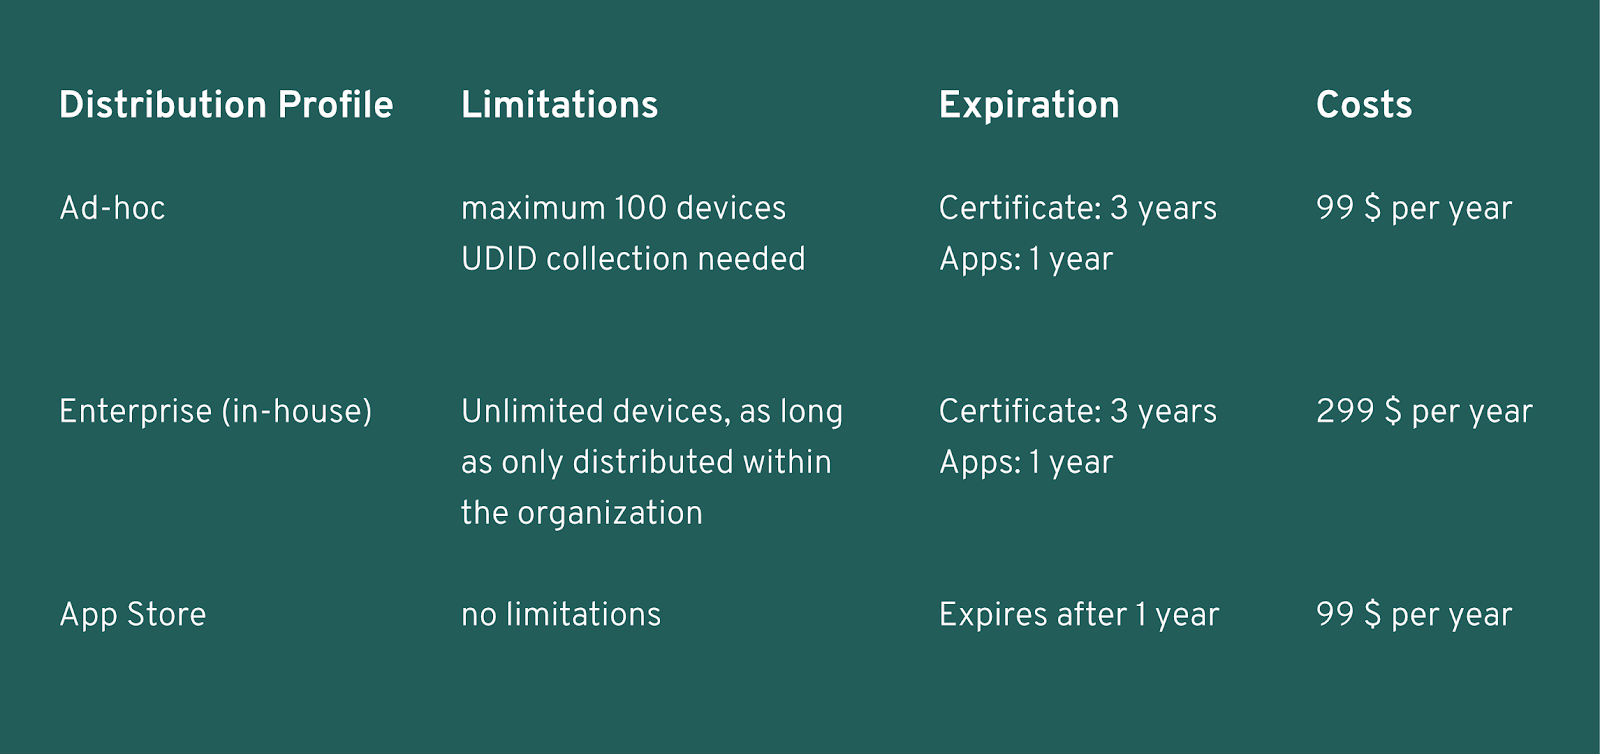
There are 3 different distribution provisioning profiles: Ad-hoc, Enterprise and App Store.
Distribution 📤 Ad Hoc 👥
Certificate: Distribution
Provisioning Profile: Ad Hoc
Ad Hoc signing allows your app to run on a specific set of devices, which you need to register in advance. This is done in the Apple Developer Portal and requires the submission of a unique device identifier (UDID). We explained everything you need to know about adding an UDID to the Apple Developer Account in a recent blog post: how to add UDID (iOS devices) to your Apple Developer Account.
Ad Hoc distribution is a practical way to test applications on a small group of specific iOS test devices. The registration of the devices is needed due to the fact that running an app on multiple devices means that more people could possibly be exposed to apps that do malicious things. This is why Ad Hoc distribution is a bit more restrictive.
Distribution 📤 – Enterprise (in-house)🏢
Certificate: Distribution (Enterprise)
Provisioning Profile: Universal Distribution
If you need to test your beta application with a large group of testers you need to collect every single testers iOS device UDID, which is highly impractical. Besides that, Apple does not support more than 100 registered Ad Hoc devices for an app. You can circumvent this by using an Apple Enterprise certificate. This is a separate account that costs a bit more than a standard developer account. It does not have the possibility to deploy apps on the regular App Store, but you will get this: With Enterprise signing of your apps, you can run your apps on any device, without having to register the UDIDs in advance!
To achieve this, you need to use the enterprise account to generate a specific set of certificates and provisioning profiles. Generally, if you have lots of apps that you want to distribute, it's best to make a wildcard provisioning profile that allows any app to be signed with it.
But be aware that you can only use an enterprise profile within your organization.
Distribution📤 – App Store🌎
Certificate: Distribution
Provisioning Profile: Distribution
To distribute your app in the App Store, it needs to pass the Apple App Review. This way, you also don't have to register the devices that the app can run on beforehand – similar to Enterprise signing. Apps that are on the store are implicitly trusted. You just sign it with your distribution certificate and provisioning profile, upload it to App Store Connect and you're good to go – for as long as your Developer Membership at Apple is valid.
How to Code Sign for Updraft
When you use Updraft internally, we recommend to use an Enterprise (in-house) certificate because this provides the most hassle-free experience once everything is set up. If you are using a regular apple developer account, you probably prefer to use Ad Hoc signing since it comes with your developer account without any additional costs. Make sure to pre-register all the devices that you want to run the app on.
Summary
In this article we have explained what Code Signing is all about and why it's needed to run your apps. We have also explored the different components and how they come together to distribute your apps in different ways. If you are having trouble with Code Signing or getting your apps to run when distributed with Updraft, feel free to contact us and we'll do our best to get you up and running.